
개발 배경
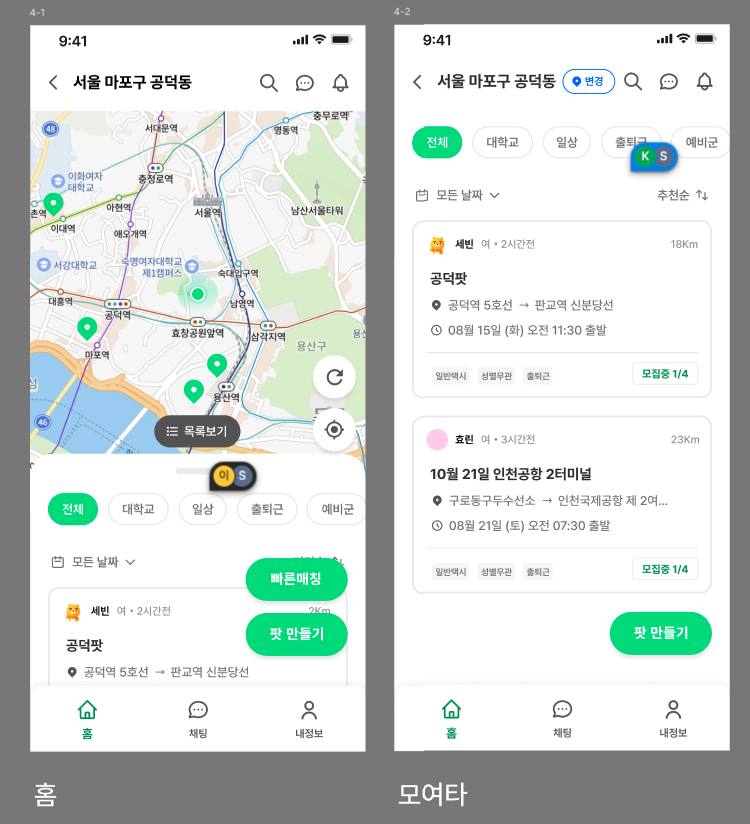
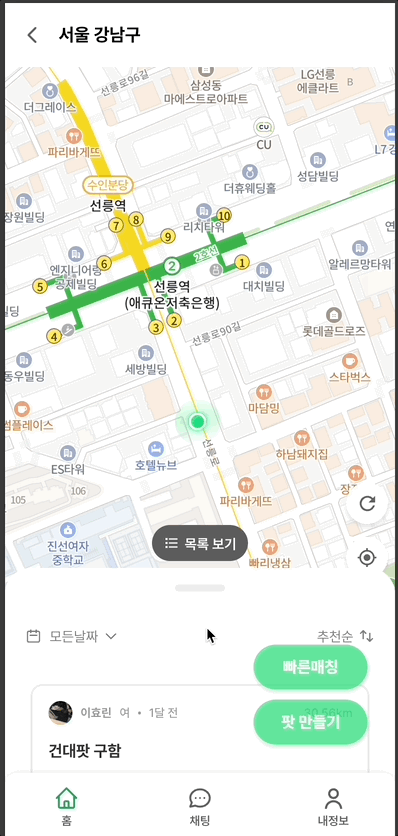
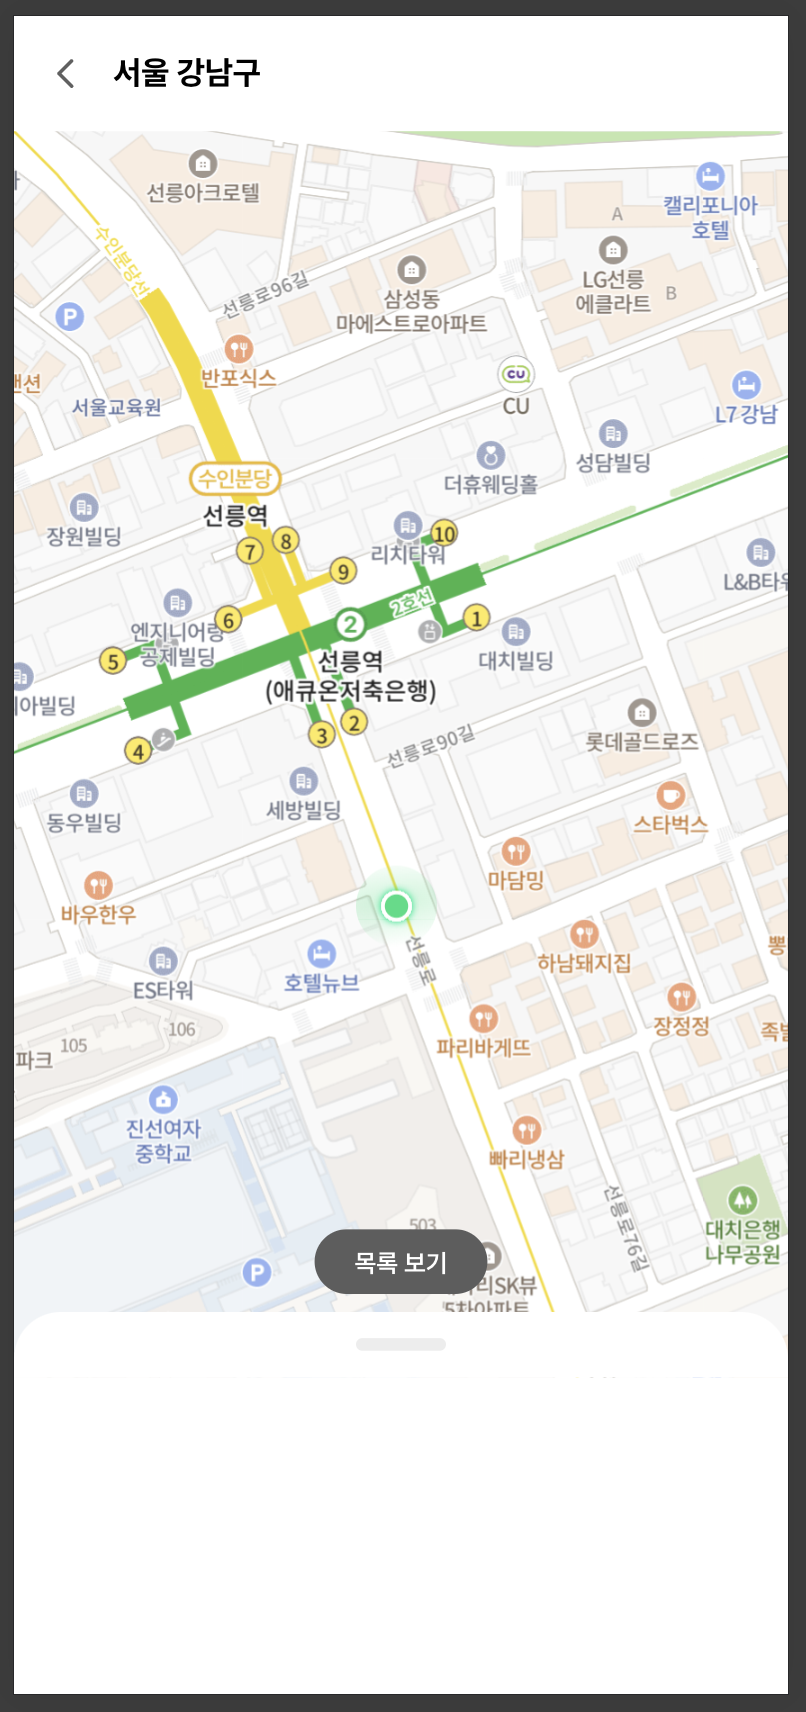
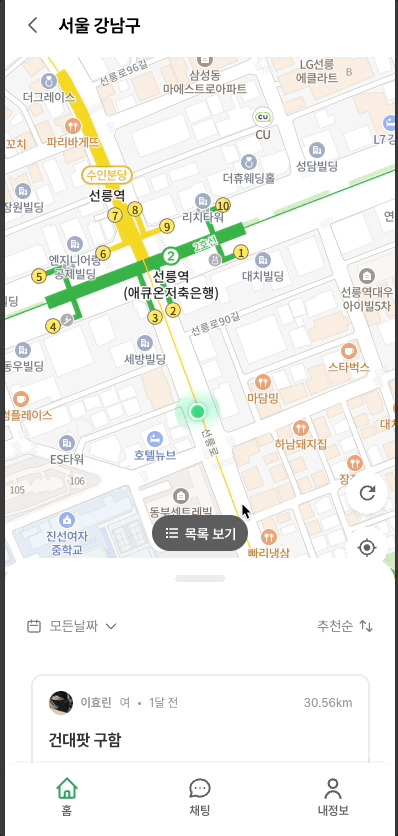
모여타 프로젝트의 디자인이 나왔는데, 기본 홈 화면이 아래와 같은 디자인이었습니다.
목록보기 버튼을 누르거나, BottomSheet의 핸들을 잡아 위로 올리면 아래에 있던 BottomSheet가 위로 올라오는 방식으로 동작해야 했습니다.
처음엔 라이브러리를 사용하려 했으나, 모여타는 웹 앱이었기에 관련된 라이브러리를 찾을 수 없었습니다 🥲
(모바일에는 해당 라이브러리가 많던데...)
그래서 결국 그냥 내가 만들어야겠다 ! 생각했고, 정말 스트레스 받아가며 열심히 만들었습니다..!!
BottomSheet란?
바텀시트(BottomSheet)는 화면 하단에서 올라오며 유저에게 추가적인 정보를 보여주는 UI 컴포넌트입니다.
MaterialUI 에선 BottomSheet를 3가지로 정의하고 있습니다.
(여기선 주요한 2가지에 대해서만 작성하고 추가적으로 궁금하신 분들은 Material Design 문서를 보시면 좋을 것 같습니다 !)
1. Standard BottomSheet
화면 하단에 메인 화면과 함께 존재하며 메인 화면과 BottomSheet 화면을 동시에 보고 인터렉팅 할 수 있습니다.
주로 빠르게 스크롤되거나 펼쳐질 때 사용됩니다.
2. Modal BottomSheet
모달 바텀시트는 화면의 나머지 부분과 상호작용을 차단하며 선택사항을 제공합니다. 모달 바텀시트는 모바일에서만 사용합니다.
기능 세부사항
1. 바텀시트를 위로 올리기
목록 보기 버튼을 누르거나, 바텀시트의 핸들(혹은 본체)를 잡고 위로 올리면 바텀시트 전체가 위로 올라와야 합니다
2. 바텀시트가 올라오고 난 후 위로 스크롤 ⬆️
바텀시트를 위로 스크롤 할 경우 내부 컨텐츠가 스크롤 되어야 합니다.

2. 바텀시트가 올라오고 난 후 아래로 스크롤 ⬇️
2-1 ) 만일 바텀시트의 컨텐츠가 최상단에 있을 경우
위에 스크롤 할 컨텐츠가 더 없다면 아래로 스크롤한다면 바텀시트를 아래로 내려야합니다.
2-2) 위에 스크롤 할 컨텐츠가 더 있는 경우
바텀시트가 내려가면 안되고 내부 컨텐츠가 스크롤 되어야 합니다. (이 부분을 가장 공들여서 만들었습니다 )
구조 파해치기


LocationHeader
최상단에 위치해있으며, BottomSheet가 위로 올라갈 경우 목록보기 버튼 및 핸들을 가려주는 역할을 합니다.
BottomSheet
화면 하단에 상주하는 컴포넌트로, Openbutton 컴포넌트와 핸들, 컨텐츠 모두를 포괄합니다.
OpenButton
BottomSheet를 올리는 역할을 하는 버튼으로, 터치시 바텀시트 몸체가 위로 올라가야 합니다.
BottomSheetHandler
BottomSheet의 상단에 존재하고, 유저는 이 헤더를 끌어당겨 바텀시트를 움직일 수 있습니다.
BottomSheetContent
BottomSheet 내부에 인터렉티브한 컨텐츠를 넣을 공간입니다. BottomSheet 내부에서 스크롤이 가능합니다.
ContentHeader
컨텐츠 필터링을 담당하는 헤더입니다. BottomSheetContent 내부에서 위치는 고정되어야하고, 스크롤시에도 함께 움직이면 안됩니다.
Page 구조 잡기
우선 가장 기본이 되는 페이지의 구조를 잡습니다.
function MainPage() {
    return (
        <Container>
          <Header>
            <LocationHeader />
          </Header>
          <NaverMap />
          <Bottom>
            <BottomSheet />
          </Bottom>
        </Container>
      );
}

const Container = styled.div`
  flex: 1;
  display: flex;
  flex-direction: column;
  width: 100%;
  height: calc(100vh - 64px);
  overflow: hidden;
`;

const Header = styled.div`
  height: ${HEADER_HEIGHT}px;
  position: sticky;
  background-color: #ffffff;
  display: flex;
  justify-content: flex-start;
  align-items: center;
  padding-left: 4%;
  z-index: 1000000;
`;

const Bottom = styled.div`
  display: flex;
  flex-direction: column;
  position: absolute;
  width: 100%;
  bottom: 0;
  height: 258px;
`;


export default MainPage;
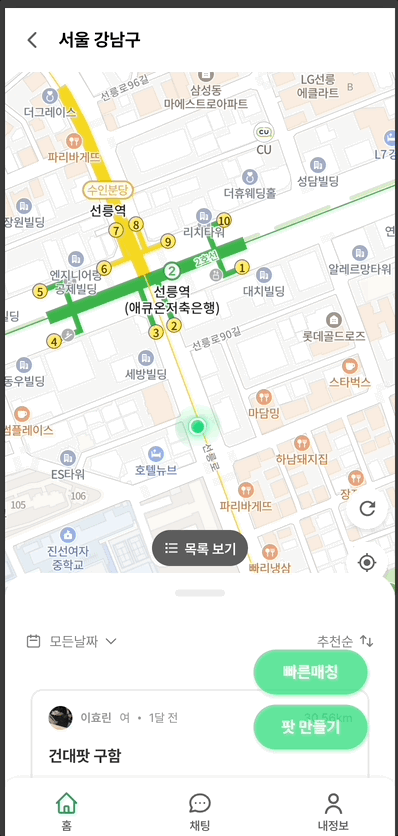
그럼 다음과 같은 구조가 나타납니다.
(네이버맵과 헤더가 구현 된 방법이 궁금하시다면 제 깃헙에 놀러오세요 .. 🌝)
인터렉션 구현
export const BOTTOM_SHEET_MIN_Y = 64 - 53 + 74; // 바텀시트가 최대로 높이 올라갔을 때의 y 값
export const BOTTOM_SHEET_MAX_Y = window.innerHeight - 200; // 바텀시트가 최소로 내려갔을 때의 y 값
export const BOTTOM_SHEET_HEIGHT = window.innerHeight + 300; // 바텀시트의 세로 길이
import { useRef, useEffect } from 'react';
import {
  BOTTOM_SHEET_MIN_Y,
  BOTTOM_SHEET_MAX_Y,
  BANKLIST_SHEET_MIN_Y,
  BANKLIST_SHEET_MAX_Y,
} from '../Constants/constant';

interface BottomSheetMetrics {
  touchStart: {
    sheetY: number;
    touchY: number;
  };
  touchMove: {
    prevTouchY?: number;
    movingDirection: 'none' | 'down' | 'up';
  };
  isContentAreaTouched: boolean;
}

export default function useBottomSheet() {
  let MIN_Y = BOTTOM_SHEET_MIN_Y;
  let MAX_Y = BOTTOM_SHEET_MAX_Y;

  const sheet = useRef<HTMLDivElement>(null);
  const content = useRef<HTMLDivElement>(null);

  const metrics = useRef<BottomSheetMetrics>({
    touchStart: {
      sheetY: 0,
      touchY: 0,
    },
    touchMove: {
      prevTouchY: 0,
      movingDirection: 'none',
    },
    isContentAreaTouched: false,
  });

  useEffect(() => {
    // 컨텐츠 영역 터치시 바텀시트가 올라가지 않도록
    const canUserMoveBottomSheet = () => {
      const { touchMove, isContentAreaTouched } = metrics.current;
      const scrollTop = content.current!.scrollTop;
      if (isContentAreaTouched && scrollTop > 0) {
        return false;
      }

      if (sheet.current!.getBoundingClientRect().y !== MIN_Y) {
        return true;
      }

      if (touchMove.movingDirection === 'down') {
        return content.current!.scrollTop <= 0;
      }
      return false;
    };

    const handleTouchStart = (e: TouchEvent) => {
      const { touchStart } = metrics.current;
      touchStart.sheetY = sheet.current!.getBoundingClientRect().y;
      touchStart.touchY = e.touches[0].clientY;
    };

    const handleTouchMove = (e: TouchEvent) => {
      //   console.log('handleTouchMove', e.touches[0]);
      const { touchStart, touchMove } = metrics.current;
      const currentTouch = e.touches[0];
      console.log(touchStart.touchY, currentTouch.clientY);
      if (touchMove.prevTouchY === undefined) {
        touchMove.prevTouchY = touchStart.touchY;
      }

      if (touchMove.prevTouchY === 0) {
        // 맨 처음 앱 시작하고 시작시
        touchMove.prevTouchY = touchStart.touchY;
      }

      // 방향 설정
      if (touchMove.prevTouchY < currentTouch.clientY) {
        touchMove.movingDirection = 'down';
      }

      if (touchMove.prevTouchY > currentTouch.clientY) {
        touchMove.movingDirection = 'up';
      }

      if (canUserMoveBottomSheet()) {
        // e.preventDefault();
        const touchOffset = currentTouch.clientY - touchStart.touchY;
        let nextSheetY = touchStart.sheetY + touchOffset;

        if (nextSheetY <= MIN_Y) {
          nextSheetY = MIN_Y;
        }

        if (nextSheetY >= MAX_Y) {
          nextSheetY = MAX_Y;
        }

        sheet.current!.style.setProperty('transform', `translateY(${nextSheetY - MAX_Y}px)`); //바닥 만큼은 빼줘야함.
      } else {
        document.body.style.overflowY = 'scroll';
      }
    };

    const handleTouchEnd = () => {
      document.body.style.overflowY = 'scroll';
      const { touchMove } = metrics.current;

      // Snap Animation
      const currentSheetY = sheet.current!.getBoundingClientRect().y;

      if (currentSheetY !== MIN_Y) {
        if (touchMove.movingDirection === 'down' && content.current!.scrollTop <= 0) {
          sheet.current!.style.setProperty('transform', 'translateY(0)');
        }

        if (touchMove.movingDirection === 'up') {
          sheet.current!.style.setProperty('transform', `translateY(${MIN_Y - MAX_Y}px)`);
        }
      }

      // metrics 초기화.
      metrics.current = {
        touchStart: {
          sheetY: 0,
          touchY: 0,
        },
        touchMove: {
          prevTouchY: 0,
          movingDirection: 'none',
        },
        isContentAreaTouched: false,
      };
    };
    if (sheet.current) {
      sheet.current.addEventListener('touchstart', handleTouchStart);
      sheet.current.addEventListener('touchmove', handleTouchMove);
      sheet.current.addEventListener('touchend', handleTouchEnd);
    }

    return () => {
      if (sheet.current) {
        sheet.current.removeEventListener('touchstart', handleTouchStart);
        sheet.current.removeEventListener('touchmove', handleTouchMove);
        sheet.current.removeEventListener('touchend', handleTouchEnd);
      }
    };
  }, []);

  const handleUp = () => {
    if (sheet.current === null) return;
    sheet.current!.style.setProperty('transform', `translateY(${MIN_Y - MAX_Y}px)`);

    // metrics 초기화.
    metrics.current = {
      touchStart: {
        sheetY: 0,
        touchY: 0,
      },
      touchMove: {
        prevTouchY: 0,
        movingDirection: 'none',
      },
      isContentAreaTouched: false,
    };
  };

  const handleDown = () => {
    sheet.current!.style.setProperty('transform', `translateY(${MAX_Y}px)`);
    // metrics 초기화.
    metrics.current = {
      touchStart: {
        sheetY: 0,
        touchY: 0,
      },
      touchMove: {
        prevTouchY: 0,
        movingDirection: 'none',
      },
      isContentAreaTouched: false,
    };
  };

  useEffect(() => {
    const handleTouchStart = () => {
      metrics.current!.isContentAreaTouched = true;
    };

    if (content.current) content.current!.addEventListener('touchstart', handleTouchStart);
    return () => {
      if (content.current) content.current!.removeEventListener('touchstart', handleTouchStart);
    };
  }, []);

  return { sheet, content, handleUp, handleDown };
}
최종 결과
'🩵 React' 카테고리의 다른 글
| [React] 리액트를 사용하는 이유 (컴포넌트 분리가 왜 중요할까 ?) (0) | 2024.11.11 |
|---|---|
| [트러블 슈팅] Geolocation API가 비정상적인 데이터를 받아올 때 (0) | 2024.08.26 |
| [React] Geolocation API의 느린 문제 (2) - 해결방안 (3) | 2024.06.17 |
| [React] Geolocation API의 느린 문제 (1) - 문제정의 (3) | 2024.06.17 |
| [React] useMemo를 이용한 결과 값 최적화 (1) | 2024.06.13 |